Monday 31 October 2016

20 Microsoft Edge keyboard shortcuts to try now


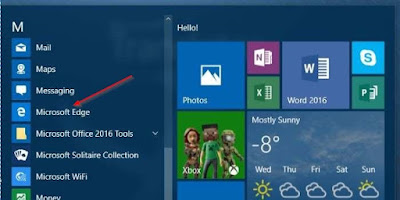
Edge proves to be a milestone in Microsoft’s evolution towards a fast and modern looking web browser. One can definitely increase productivity by using various Microsoft Edge keyboard shortcuts available in the program.

Microsoft Edge Browser


Here’s a handy compilation of the most essential Microsoft Edge keyboard shortcuts you must know. Let’s start!

Best keyboard shortcuts for Microsoft Edge

Tab and window management

1. Jump to next or previous tab

You can use Ctrl-Tab to jump one tab to the right and Ctrl-Shift-Tab to jump one tab to the left.

2. Jump to a specific tab

 In order to jump to a specific tab among the many you have opened, press Ctrl and a number key between 1 and 9. For instance, Ctrl-5 takes you to the fifth tab from the left. This Microsoft Edge keyboard shortcut is useful only if the number of open tabs is less than 10.

3. Open link in a new tab

Some links open in new tab while others open in the current tab. If you want to take control of this behavior, just press Ctrl when you click on a link. This will open the link in a new tab, while you remain on your current tab. Also, you can use Shift-click to open a link in new window.

If you prefer using mouse, click the middle mouse button to open a link in new tab, and Shift-middle click opens a link in a new window.

4. Close current tab

Rather than clicking the close button (X mark), just press Ctrl-W to close a tab. In order to open a previously closed tab, simply hit Ctrl-Shift-T on your keyboard.

5. Move tab to new window

Press Ctrl-Shift-N to open your current tab in a new window

6. Duplicate your current tab

If you want to open a replica of your current tab, press Ctrl-K to get an identical one in a new tab.

7. Drag a tab

As far as the flexibility is concerned, Edge is no less than most of the modern browsers out there. You can click and drag a tab to a different position among the row of current open tabs.

You can even drag a tab out of the current window and open it in a new window, or drag it from one window to another.

8. Open a Private window

Press Ctrl-Shift-P to open a browsing in private window.

9. Minimize a window

Use Alt-spacebar-N to minimize the Edge browser window.

10. Resize or move

With Microsoft Edge keyboard shortcuts, it’s possible to move or resize browser window without having to click-and-drag from its edges. Simply press Alt-spacebar-M to move your Edge window using the arrow keys. Similarly, press Alt-spacebar-S to resize a window using the arrow keys.

Page Navigation

11. Move back or forward a page

Press Alt-left arrow to move back a page and Alt-right arrow to move forward a page on your current tab.

12. Control the URL bar

Rather than clicking on the URL bar, you can press Ctrl-E to move your cursor to the URL bar.

13. Search copied text

Press Ctrl-Shift-L to start a Bing search with the text you have copied to the clipboard.  The results will be shown in your current tab.

14. Find bar

You can hit Ctrl-F to display a Find bar for searching keyword or phrase on the current page. Hit Enter to move to the next instance of your search result and Shift-Enter to move to the previous instance.

15. Move to top or bottom of page

If you want to jump to the bottom of a web page, hit the End key. You can then return to the top by pressing the Home key.

16. Page up and down

When viewing a page on Edge browser, press the spacebar to page down on a page and Shift-spacebar to page up.

17. Zoom

If you are having trouble reading text on a page, hit Ctrl+ [plus sign] to zoom in and Ctrl+ [minus sign] to zoom out. To return to the original zoom level simple hit Ctrl-0.

18. Reading mode

For a clean and clutter-free version of the current page, hit Ctrl-Shift-R to enter the reading mode.

19. Stop or reload a page

Press Esc button to stop a page from loading and Ctrl-R or F5 to reload a page.

20. Return home

Well, if you have decided to switch to Microsoft Edge browser, then these keyboard shortcuts are worth remembering. No matter where your Internet explorations take you, you can always return home using the Microsoft Edge keyboard shortcuts. Just press Alt-Home to go to your home page.

Our handy list of 20 Microsoft Edge keyboard shortcuts ends here. Of course, these shortcuts provide a better way to work efficiently and quickly. So, give them a try now!

Wednesday 26 October 2016

Top 5 free firewall software for Windows


When it comes to system security, we give a lot of priority to antivirus solutions, but there’s one more thing that we completely ignore: firewall. Yes, you needa firewall software for Windows to get an additional layer of protection for your PC. If you are serious about your computer security, we recommend having both a firewall and antivirus installed on your system.

There are many firewall programs out there, but not all of them are free and reliable. In this article, we are going to cover the top 5 free firewall software for Windows, explaining their key features and where to download them.

Top firewall software for Windows:


ZoneAlarm Free Firewallhas the longest history, and it is still one of the most widely used firewall software for Windows in the market. ZoneAlarm features a central dashboard that lets you easily manage your firewall settings.

ZoneAlarm Free Firewall Logo


The best part is that it comes with a scanning option that monitors your PC and automatically performs the action according to the program it detects. In case you want to disable the entire firewall, one click is all it takes.


In terms of strength and reliability, there is no match for Comodo firewall software for Windows. Once installed, Comodo will show a lot of popups as it detects various applications running on your desktop. So, you need to allow each one in order to add these applications to a list of trusted programs. Luckily, Comodo has a cloud-based option that automatically allows programs from trusted sources.

Comodo Firewall Logo

If you are a game enthusiast, you can enable a useful feature called Game Mode that lets you play games without alerts or network issues. However, if you don’t like too many popups, then Comodo Firewall probably isn’t for you.


Most firewall software for Windows offers a multitude of security tools, but PeerBlock is designed specifically to block traffic from IP address that you don’t trust. This narrow focus of PeerBlock helps it carry the main task very well without requiring much interference from the user.

PeerBlock Logo

It lets you choose the kind of websites you want to block, including adware networks, spyware, and other sources that may harm your computer. Moreover, it regularly updates its list of blocked sites to keep them away from your PC.


Online Armor Free not only offers all the basic functions of a firewall, but it also has some power-packed features such as keylogger guard, tamper protection, worm protection, and autostart protection.
Online Armor Free Logo

The program is easily to install and includes many initial settings and configurations that protects you from a wide range of online threats.


This one’s the first full-featured firewall software for Windows in the market. Agnitum is relatively newer in the field, but the application performs really well. Though, the paid version offers complete protection; you still get antivirus, firewall and antispam protection in the free version.
Agnitum Outpost Firewall Free Logo

You need to register to Agnitum Outpost in order to use it, and this can be done by providing your name and email address on the registration page.

If you are looking for an alternative to the default Windows firewall, you can choose from the above list of the Top 5 free firewall software for Windows that we have provided. 

Everything you need to know in Android 7.1 update


Google has finally announced its latest version of Android, which comes as an update to the existing Android 7.0 build. The Android 7.1 update packs with it some exclusive features, which set it apart from other Android versions.

Let’s have a look at what’s new in the Android 7.1 update.

Android 7.1

According to Google, a lot of changes are on the developer side, which means you will see these changes implemented through apps and games and not in the whole Android interface.

App Shortcuts API

The first among the Android 7.1 update is the App Shortcuts API, which lets developers design app shortcuts that can be placed directly on a user’s launcher. Using these shortcuts, users can jump directly to a specific point inside an app. For instance, Facebook users could create a shortcut that jumps directly to Messages, allowing them to skip the news feed. So, users will be able to place labels, authors, descriptions, or URLs quickly with easy access.

New Launcher Icons

To change the visual nature of Android, Google also introduced new launcher icons for their apps. The icons are nicely crafted to give a circular look and kept inside a white button. In case you do not like these circular icons, you can always switch to previous look from the launcher settings.

Image Keyboard Support

Google also brings in Image Keyboard Support in the Android 7.1 update. Now, users have wide options to choose from while typing from keyboard, including GIFs, stickers, and other content. This is much similar to the Gboard keyboard app for iPhone. Maybe Google could bring Gboard support for Android too, in the near future.

Store Manager Intent

At the top of all, the Android team also introduced Store Manager Intent. With this, an app will direct you to a new Settings screen to clear unused files and free up space on your Android device. So, if you ever run out of space on your device, this will surely help you.

This was all Google introduced in its latest update of the latest Android operating system. You can expect to see the new features on Pixel, as well as other Android devices that receive the Android 7.1 update.

Tuesday 25 October 2016

5 best KMPlayer features you should know about


Today, there are a lot of media players available in the market, but choosing the best one from the stack of so manyis a difficult task. Some might look for better media organization features, while others may choose the one that supports loads of audio and video formats. KMPlayer is a full-fledged media player which has shown considerable improvements in the recent times. It boasts a large number of audio and video processing features, eye-candy interface, 3D video playback option and a powerful rendering engine. 

Considering all these things, we have decided to list some of the best KMPlayer features that you probably don’t know about.

Top KMPlayer features you must know

1. Excellent media files organization

It’s always better to have an organized media library that contains a separate section for both audio and video files. KMPlayer allows you to handle all you audio and video files via its powerful Playlist Editor. You can create a playlist for your music and movies by selecting either Music or Video options under AlbumArt section in the main window.

 Creating a playlistis quite an easy task as you just need to:
  • On the home screen, select Video Playlist option to access the Video Library
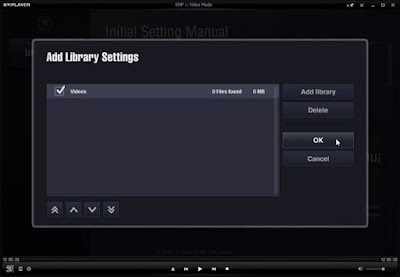
  • Hit the Import button to the left to open Add Library Settings window
  • Click on Add Library option, enter library name and click OK.

KMPlayer enables you to add as many video libraries as you want. Once you’re done, select them and hit OK to move to the Add Folder Settings options. From here you can assign a source folder to your libraries.
You can also create a Music library by following similar steps as you did for Video library creation.

Add Library Settings


2. Support for 3D videos

With the success ofHD video content, many tech giants have now started working in the field of 3D video technology as well. To join the club, KMPlayer also introduced 3D video content support to give you a more immersed video-watching experience. Besides Blu-ray, thebest KMPlayer features also includes 3D Movie Plus service that lets you watch 3D movie trailers, commercials, and documentaries.

KMPlayer Supports 3D Videos


While watching a 3D movie, you can adjust various parameters via its right-click context menu. Here, you can define3D screen control settings and modify subtitle settings from the 3D subtitle controls. Moreover, KMPlayerhas various 3D plugins.

3D Screen Controls


3. Service Apps

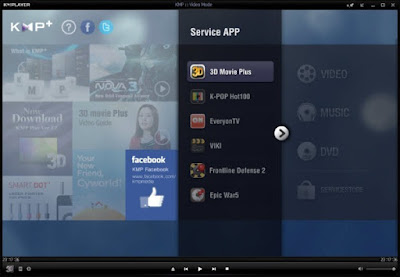
The list of best KMPlayer features also includes a Service APP, which contains numerous applications such as 3D Movie Plus, Billboard, EveryonTV, VIKI, and many others. These service apps are made to work from within the player only, so you will not have to go anywhere in order to use them. Additionally, you may have a look at various commercials, games and upcoming events from within the interface.

KMPlayer Service Apps


4. Control Box for video, audio & subtitles

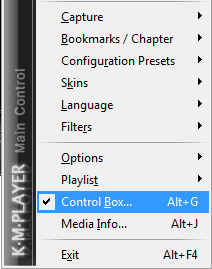
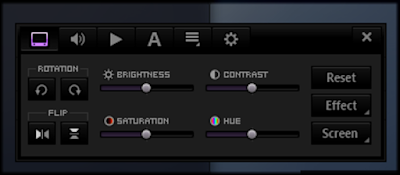
Another great feature that’s worth mentioning is a Control Box, which can be accessed through right-click context menu. Using the Control Box, you can customize and modify a lot of settings in order to meet your demands. It has six buttons at the top - Video, Equalizer, Subtitles, Playback loop, Frame Capture settings, and Preferences. You can configure settings such as brightness, contrast, hue, saturation, screen rotation, flip, video resizing, as well as implement some video effects like Soften, Sharpen, Blur, grayscale, etc.

KMPlayer Control Box


Control Box Features


It’s also possible to capture video and audio streams and a take screenshot of a video to save as an image. By clicking on the Audio and Video Capture options, you can define various output parameters.


5. Watch multiple videos simultaneously

Most media players out there allow you to watch only one video at a time, but no need to worry, as KMPlayer lets you play multiple videos simultaneously. In order to use this great feature, just go to the Preferences window. Then under General settings, simply uncheck Disallow multiple instances and you are done. 

Download KMPlayer to enjoy watching multiple movies at the same time.

KMPlayer supports Multiple Videos Simultaneously

Apart from offering an eye-candy GUI, KMPlayer also packs some great features to make it a wonderful multimedia application for all kinds of users. There are a plenty of them, but we have covered only the 5 best KMPlayer features that you should know about. 

Thursday 20 October 2016

How to take faster screenshots in Windows 10


Capturing screenshots is a critical task that you can never skip. There are many instances you may need to take a screenshot. So it’s obvious that you always need an efficient way to take faster screenshots in Windows 10.


The default method to take screenshots in Windows 10 is to use Print Screen key and paste screenshots in paint where you can edit and save them manually. However, this becomes quite a torture when it comes to capturing and saving hundreds of screenshots daily (there are many people who do so, like researchers, bloggers and tech personals).

That’s why we’ve come up with this post, where we’ll guide you on how to take faster screenshots in Windows 10. Let’s get started:

How to take faster screenshots in Windows 10


There are three ways you can take faster screenshots in Windows 10:

Method 1. Using modifier keys


The simplest way to capture screenshots in Windows 10 is doing so using Windows key + Print Screen key combination. For this you’ve to follow some simple steps mentioned below:

Step 1. Press Windows key + Print Screen

Step 2. Open Paint application

Step 3. Press Ctrl + V (paste) key combination. The captured screenshot will appear on the empty paint screen, where you can edit and save it manually.

These captured screenshots will be saved at This PC > Pictures > Screenshots location by default.

Note

There is an issue with the above mentioned key combination. It captures the entire display, including the secondary display if you have attached any. So you can use the Alt + Print Screen combination. It only captures the currently active screen. However, you’ll still have to paste the capture into paint and save it manually.


Method 2: OneDrive or Dropbox


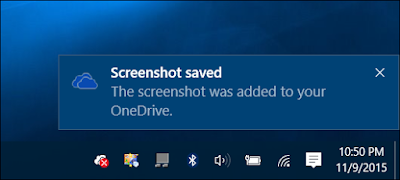
Take Screenshot in Windows 10 by using OneDrive


Yet another efficient method to capture screenshots in Windows 10 is doing so using cloud storage applications like Dropbox or Microsoft’s OneDrive (which comes pre-installed on Windows 10). Using the apps, you can not only capture screenshots swiftly, but also save them on the cloud and access them later.

To capture screenshots using OneDrive or Dropbox:
  • You’ll have to use Alt + Print Screen key combination

However, to do so you’ll need to enable screenshot capture on both the apps.

How to enable Screenshot capture on OneDrive?

To enable Screenshot capture on OneDrive, you’ll need to:
  • Click the Show hidden icons button in the Notification Area in the Taskbar
  • Right click OneDrive icon
  • Click Settings
  • Open the Auto Save tab and tick the Automatically save screenshots capture to OneDrive checkbox

How to enable the Feature on Dropbox?

Here’s how to enable Screenshot capture on Dropbox:
  • Click the Show hidden icons button in the Notification Area in the Taskbar
  • Right click the Dropbox icon
  • Click the settings drop-down app that appears in the upper right corner of the window
  • Click Preferences
  • Open the Import tab
  • Check the box beside Share screenshots using Dropbox option


Method 3. Using the Snipping tool


Take Screenshot in Windows 10 by using Snipping Tool


Well, if you don’t want to use the above mentioned methods, you can go for this one i.e you can capture faster screenshots in Windows 10 by using the built-in Snipping tool. The utility allows you to capture precise screenshots of the specific parts of your screen and easily save them on your PC.

To use the program, you’ll need to:
  • Click Start button and search snipping tool
  • Click on the app to open it

If you want to capture an open Window:
  • Click the drop-down menu beside New
  • Select Window Snip
  • Click the Window you want to capture

Here’s how you can capture a specific portion of the screen:
  • Click the dropdown beside New
  • Select Free-form Snip or Rectangular Snip
  • Now, Click! Hold to start the capture! And drag until you’ve selected the entire area you want to capture


In the meantime, you can also customize Taskbar inWindows 10 if you want to make the interface better. Apart from the built-in tools in Windows 10, you can use third-party screenshot capture applications as well. There are plenty of them available in the market.

That’s it! Our guide on how to take faster screenshots in Windows 10 ends here. So, if you want to capture faster screenshots on your Windows 10 device. You can choose for any of the above mentioned methods. They’ll definitely come handy!


Stay tuned for more updates!

Wednesday 19 October 2016

Best browser tips to revive your Internet experience


The web browser you’re using right now may function perfectly for you when it comes to speed and security. But there’s more to it than just the functionality. Why not use our best browser tips to customize your favorite browser.
It won’t take long for your browser to get pretty cluttered with bookmarks, extension icons, and much more. Eventually, you look at it in despair, and end up closing the browser. So, why not clean up the mess left over by your browser and make it a pleasure to use.
Here are the best browser tips to revive your Internet experience.


Best browser tips: Let’s start.


1. Customize toolbars


No one likes to work on a browser that’s loaded with rarely-used toolbar buttons. Well, that’s the reason we’ve brought the best browser tips to keep them away from your sight. You can restore them anytime if you need to.

Chrome

If you use Chrome, right click on an extension in the toolbar and select “Hide in Chrome Menu” to make it disappear. To restore any extension, go to the Chrome menu, right click on the extension you want to restore, and then select “Keep in Toolbar”. You can also rearrange the existing toolbar icons according to your preferences with the mouse drag and drop.

Firefox

To make a toolbar button disappear in Firefox, right click on the button and select “Remove from Toolbar” in the options. To rearrange toolbar buttons or retrieve hidden ones, open the “Customize” dialog via the Hamburger icon at the top-right corner. Click on “Exit Customize” button once you are done.

Safari

To bring up customization options for Safari browser, right click on an empty space next to the address bar and hit “Customize Toolbar”. You will be shown a dropdown box with numerous toolbar buttons, where you can add new buttons, remove existing ones, or rearrange them as you like.

Opera

In Opera browser, you need to visit the Extensions page to hide toolbar buttons. To bring up the page, just right click on any extension and select “Manage Extension” in the context menu. Then you can easily hide any extension by selecting its “Hide from toolbar” checkbox.

2. Get rid of unused elements


Besides toolbar buttons, there are a bunch of elements that sit unused on your browser. Here are a few best browser tips to get rid of that clutter easily.

The Bookmark option is really handy, but if you don’t use it regularly and it’s no more required, simply hide it by pressing Ctrl+Shift+B on your keyboard. Memorize this shortcut if you use a browser among Chrome, Opera and Safari, while Firefox users need to select View > Toolbars > Bookmarks Toolbar to hide the Bookmarks bar.

If you use Safari browser, hide the sidebar by selecting View > Hide Sidebar from the toolbar. Alternatively, you can use the keyboard shortcut Ctrl + Shift + L to toggle the sidebar.

In Firefox, hit the Close sidebar button (an “x” mark) at the top-right in the sidebar to hide it.

If you use Opera, go to View menu and hide the sidebar, the tab bar, and even the toolbar.
Chrome users can relax, as there isn’t much to hide in Chrome except the toolbar buttons and the Bookmarks bar.

3. Change browser themes


Installing a new theme can change the look and feel of your browser, making it more personal. This one among our best browser tips is quite easy too. With custom themes, you can give a new skin to your browser, and the result is impressive if you choose the right one. Start searching the theme gallery included in your browser.

Chrome and Firefox offers many interesting themes to choose from, which you can access from its online Themes gallery.

Opera is packed with a decent number of themes under Preferences > Basic > Themes. You can explore more by visiting Opera’s Theme page.

Unluckily, Safari doesn’t offer support for themes, however, you can customize the start page, which we will discuss in the next point in our best browser tips list.


4. Tweak your browser’s New Tab Page


You use the new tab many times in a day to access your top visited sites. If you don’t like what you see on that page, consider giving it a makeover.  You can add a start screen or Speed Dial, change New Tab settings, or install extensions to make every New Tab more interesting.

Chrome users have a multitude of extensions to make your start screen more productive. If you do not use Chrome, you still have various options to tweak your browser’s start page.

Firefox, Safari and Opera users can select from the built-in start page settings or get a personalized one from “start.me”.


5. Look into accessibility settings and extensions


If you’d already used the aforementioned best browser tips, your browser will be already looking way better than it was before. You may be satisfied with the result, but we have a few more tweaks to make your browser less painful for you.

For beginners, try setting a more comfortable font size and type to make it less stressful on your eyes. You may also set a default zoom level to make text more readable. You can tweak these settings from here:
·        Chrome - Settings > Show advanced settings > Web content
·        Firefox — Preferences > Content > Fonts & Colors
·        Safari — Preferences > Advanced > Page Zoom
·        Opera — Preferences > Websites > Display

Instead of using this menu option, you can use Ctrl + “+” and Ctrl + “-” to zoom in and out of a page with a breeze. Besides tweaking fonts, we recommend installing some extensions that are dedicated for enhancing visual accessibility of your browser.

If you spend most of the time on your browser, these best browser tips to revive your Internet experience are worth trying.


Which extension or tweak you find most useful to improve the look and feel of your browser? Feel free to share in the comments!